Thursday, December 18, 2014

The Blue Fish Dress

I never thought I would laugh so hard in my life at a dress. One can find funny hideous things in the second-hand store but... a fish? oh my God! A dress that make you this happy for $2 is definitely something you need in your closet.

I didn't quite understand what the designer was thinking when making this dress. This is too small and not so flattering for a plus size but enormous and shapeless for a petite. Even for somebody with the "standard" measures... it was just awkward.

I spent quite a while in the fitting room figuring out how to put this on me. The dress had too much hanging fabric... spandex to be exact, which made me wonder: who in his/her insane mind wants this much hanging spandex ? the point of this type of fabric is to be tight on you, show off curves or at least make you feel fresh and comfortable. If you want a dress hanging on you to fall nicely on your figure you use chiffon or crêpe or silk... not spandex!

Fashion Designers: this is why you need to actually know about fabrics and cuts!

And don't even make me start with the fins and the neckline... please don't!. The only good thing about this dress was the color, so I put myself to work as soon as I could.

The obvious first step was cutting off the fins and some length. Then adjusted the silhouette and finished the hem.

At this point I had a nice simple summer dress, with a fresher and better look. The only additional think I had to adjust was the neckline, it was to wide and open for my so I sewed some centimeters in each shoulder.

Tried on again and looked just fine. Just fine... just plain fine [sigh]
Let's add some drama please! And mr spandex... you're supposed to... expand, right? So I pull a pinch of fabric from the front, a little bit from the back and sewed together to the right side so I could do some ruffles.

Finished the ruffles with some nice gold studs. You know me, I love decorating my clothes.

And that was my fishy refashion tale!. I know I'm not a mermaid but at least, I kept my human shape with this dress.

Wednesday, December 10, 2014

The Silk Blouse


I was a lucky girl that day!!. I found this blouse in the second-hand store, but it was brand new. It had the tags from the original store (except the original price) and a spare button attached. I loved the colors and the print of the fabric... oh AND the fabric! pure soft, delicate silk... as soft as my baby boy buttocks!!

Even though the silk is a precious material to wear, its maintenance is a nightmare. You can't just throw it in the washer and don't even think about the dryer. You can't put it to direct sunlight, you have to be careful with rough surfaces and its mortal enemy it's red wine... which is not very compatible with my personality but... still, a girl needs at least one piece of clothes made out of silk.

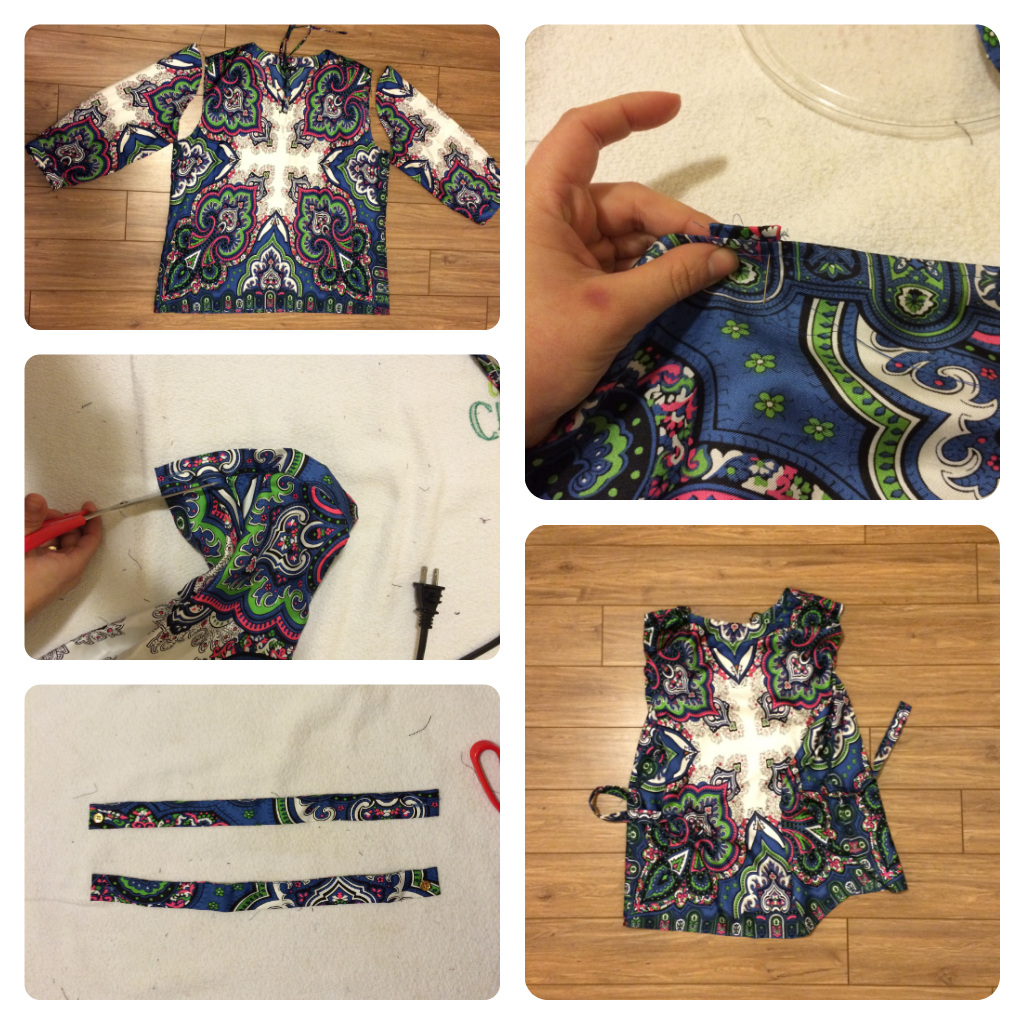
So I decided to work carefully on it, trying not to pull too much the threads and making nice and soft cuts when detaching the long sleeves. I used the finished sleeve hems as ribbons to attach them to the waist so I could join them in my back.

But the plan of joining them in the back didn't work as expected because there was too much shapeless fabric. My derrière looked like I had a pony tail... I could even make a parody of the Kim Kardashian "break the internet" picture.

So my plan b was joining the ribbons underneath the blouse. Just like this picture. For this, I had to make two big button holes in the back of the blouse, parallel to my spine. Once the buttonholes were finished I could pass the ribbons through them and attach them together with buttons.

The last step was finishing the hems and the size of the arm holes.

I have to confess I liked the final result. It's a fresh brand new blouse to go out and grab some martinis with my husband... because... you know... silk doesn't like coffee either.


Wednesday, December 3, 2014

The Purple Halter

I like being organized. It just makes my life easier. And by organized I mean to have a plan for whatever I'm doing, from cooking to travelling and specially in case of emergencies... I'm freaking scared about the idea of not knowing what to do if something gets stuck in the toilet or if we run out of gas in the highway in the middle of a winter storm.

I need planning... I need knowing... indeed, we all need to know what to do in those cases right?

The same happens when I'm working on a refashion. I generally buy the clothes knowing exactly what I'm going to do with them. I make a plan and follow it as much as I can to avoid ruining the piece and doing the opposite of my actual goal, which is, recycling clothes for re-using them, not re-throwing them away.

In this case, I bought this semi-tunic thinking in a skirt. It looked pretty straightforward so with that plan in my head and my ripper in my hand I switched gears to transformation mode.

But, once I cut off the sleeves, the improvisation bug started to itch in my head. What about a blouse? that cute embroidery at the bottom would look great on your waist or maybe on the hips... I wasn't so sure about the blouse since the neckline was horrible and there wasn't too much fabric there to make something else up... besides, I'm not that good at improvising.

Oh but... I'm also stubborn, and easy things kill me of boredom. So I decided to go the complex, improvised way hoping to get a decent outcome without stabbing myself with the scissors.

As you can appreciate in this nice collage, I removed the horrendous purple knitted squared neck (3). Then I opened up one of the remaining sleeves and measured the fabric I needed to reconstruct the front part of the blouse (3 and 4).

I passed the iron over both the amputee neck and the fabric I needed to add in to leave a trace that I could follow when sewing them together  with the machine (5)

Fabric added, I proceed give it a little bit of shape by cutting it out using the back of the blouse (that remained intact) as a guide, obviously leaving some extra centimeters to hem the armpits.

At this point, the lack of planning led me to a sleeveless blouse with halter neckline. Ain't even mad!

Next step was fixing the waistline. Not a problem, just wore the blouse inside out and did some pinning. Then some stitching. Then some more armpit fixing.

I sewed only the right side of the blouse. For the left side I added an invisible zipper so I could get myself through the blouse.

The zipper installation... [sigh] that part was tricky... thank you God for YouTube!. I found this awesome quick tutorial made by Smarmyclothes that did the work of explaining that to me in a nice and entertaining way.

Now, the last step was finalizing the new neck. When I added the fabric to the blouse, my idea was to cover my torso up to the neck, but I needed a solution like a button or a pin or a tie to be able to open and close the neck so my head can pass through.

Then I followed the tie path and made a bandanna out of the other remaining sleeve. I stitched the bandanna to the neck in both front and back leaving one side open.

After trying a nice bow tie in my neck, I remembered I  had a nice recycled necklace pendant that I converted into a brooch months ago. Sweeet!!!!

The cherry in my milkshake. Couldn't be prouder of my new blouse.

I like being organized, but from time to time I also enjoy letting myself run free with just my intuition. If something goes wrong, you can always have wine!

Monday, December 1, 2014

What makes thrifty clothes a new option for your closet?

My husband is one of those who thinks that second-hand clothes are just... ew!. And I don't blame him. Last year I bought a sweater in a thrifty store for our Ugly Sweater Party with some not-nice consequences.

Yes, it's that one in the picture.

After the party and one month later I had to go to the doctor because I had a reaction in my skin. Nothing serious and I'm not even sure if it was because of the sweater but... I still got rid of it.


Things like that turn people away from recycling old clothes. Everybody has the image of the dirty rags with fleas and dandruff. But if you have ever donated clothes to charity, you know that's not true... -because you're not dirty and don't have fleas and dandruff, right?

I'm trying to encourage textile recycling, and by recycling I mean, not only donating clothes instead of throwing them in the garbage bin but also refashioning, re-purposing and re-using them. Why? well, here are some reasons among others I have:

1. If you're concerned about dirt, germs and bugs in used clothes, consider starting a close friendship with dr baking soda and mr vinegar. Seriously, just toss the rags in a pail with hot water, add baking soda and make some bubbles with mr Vinegar. Then put them in the washer and if you're extra picky, the dryer will do the rest. If any bug can survive that killing cocktail... girl, the guy it's a nature prodigy!

2. Clothes not always are worn after they've been purchased. I've found pretty good deals during the Spring season yard / garage sales. If you're lucky enough you can find brand new clothes even with the tags on. Who said BINGO?

3. Fashion itself it's about recycling old trends.... and there's nothing better than using originals instead of faking them. Nowadays, it seems that Vintage is the new Black.... I have seen the word Vintage here, Vintage there, Vintage everywhere!!!

4. Refashioning can activate your creative-self. It's well known that crafting and doing manual work can activate the brain and yarayarayara... scientific mumbo jumbo that's actually true.

5. There's actually too much clothes in the world. Even if we all think that our closet will never be complete, the truth is, the fashion industry has flooded the world with too many pieces of clothing, leaving behind considerable amounts of pollution, and, in some cases, social issues like slavery and child labor. So, recycling can be our own way to ask the fashion industry for sustainable eco-friendly solutions.

6. Clothes recycling can save you some bucks. Just be honest. We all want to go to Paris, the city of Lights and the Fashion Capital of the world. Refahioning clothes it's a good way to start filling your piggy bank without sacrificing your closet.

And the last, but not less important thing:

Who cares where  your clothes come from as long as you are -and look- fabulous!!

Got more ideas? bring them on! Still not convinced? tell us why in the comments box!

Thursday, November 27, 2014

From mini-dress to mini-skirt... well, not-so-mini-skirt

I didn't think in trying it on in first place because I would have been naked... isn't it ironic?. This dress was really short! even for me, and you know that I'm only 145cms height. I'm not prude either, it's just... I don't have the thin, graceful and firm body of Adriana Lima... bah! who needs that body when you have a sewing machine and a $1 dollar dress that came out of the clearance corner of a store!!

Yes!! $1 dollar! isn't it amazing?

Anyways, back to the dress... I liked the colors, especially because I have some shirts that look well with whatever new design I could come up with. The other thing was the pattern, I kinda liked the shapes and the dots and... wait... is that a dragon? and is it SMILING? ookkk girl... I think I've already had too much wine...


Ok, now back to the refashion. In this case, the most obvious piece that came to my mind was a skirt, so to make this an easy-breezy refashion I used the 3-step method: Cut-Iron-Sew. This is a great method for hemming long pants, skirts or shirts (story of my life) or fixing damaged edges in the clothes.

Following these simple steps, I started by Cutting the top of the dress. I also did a couple of stitches on each side of the new skirt to adjust the waistline and adapt it to my body. Then, I did a double hem to prevent fraying and passed the Iron on it to make it firm.

The last step was Sewing the hem and that was it! in less than 15 mins my new Thanksgiving skirt was ready to shine... in the office. Yes I know, in Canada we celebrate Thanksgiving in October but... what the heck! there's always an excuse to feel pretty and new!

While the rest of Canada is under 30cms of snow, here in Halifax it's only rain!! and cold!


Friday, November 21, 2014

The Old Maid Blouse

Ok girls, I started this blog with an easy refashion and a broken needle in my first sewing machine lesson. Crap! that hurts.

But fear not! I've been practicing the whole week and today I'm proud to bring a great transformation before your eyes. Let's start off with this beauty that I found at Value Village the other day for $4.99 bucks. Obviously I don't have the way to find out how old it is but holy cow!! something with that style and cut must be very very old... from the past century perhaps?

Ok fine, I'm exagerating just a little bit. The truth is, the blouse looked too nice and well preserved to be 100 year-old. In any case, I took home this great archaeological treasure which also was the perfect candidate for a refashion with style!

What did I like about it? Besides the good quality of the fabric, it has the rare virtue of being un-wrinklable. Believe me! I washed it by hand in warm water and didn't show a single wrinkle! I wish my 30yo face skin was the same!. Finally, I liked the fine lace line around the neck and the front.... kinda charming don't you think?

Making the bias-tape
Anyways, I was still convinced that I could save this old-maid from another 100 years of solitude* so I started by removing the long boring sleeves. I was debating whether cut them off entirely or maybe leaving a little bit of... But... No! wait! for petite girls with wide back and prominent shoulders like me, the last thing we want is to grow... horizontally... so... sorry guys, you have to go! I still needed to polish up the rough border of the new short sleeves so I made a bias-tape out of the leftover fabric from the old sleeves and sewed them to the blouse.


Now the waistline. The original cut was so straight... I think the previous owner must have been a very conservative woman, I wonder if she was a nun, an orphanage principal... an Amish? anyhooo... honey, you're in different hands now and you're going to show off a little bit of curves! I said a little bit!!! I want to give the illusion of a thin waist, I don't want to look like a bad sausage wrapping. To do this, I wore the blouse backwards and started to pin the new silhouette.

It would've been easier if I had a mannequin! [sigh]. Well, me and the mirror will have to do the work.

Now back to the sewing machine. A tip for beginners like me: if you're a fan of push-up bras, try the blouse in wearing one of those, just to make sure it'll fit your boobs. Also, after pining your new silhouette, I strongly recommend using a pencil to draw the lines where the stitches are supposed to go... once you run the sewing machine it could be very difficult to keep them on the right path... and go slowly!.

And there it is! With a little bit of patience this old-cranky-maid turned into a fresh and young executive ready to grab some cocktails after work!

Look at me being proud of my new blouse!

*100 years of solitude is actually a great novel of my favorite author, Gabriel García Márquez. Nobel Prize 1982.

Wednesday, November 12, 2014

Scarlett's Curtains

Picture from: http://southernthings.web.unc.edu
If I have to choose just one single story that I utterly love, that would be Gone With The Wind. It’s a shame that nowadays they don’t make movies or write books with stories like that one.

Yes, I have to confess the old-senile lady in me yearns those kick-ass heroines like Scarlett O’hara who had to face real freaking hard situations in life… I mean, for real!... not like The Hunger Games or this girl falling in love with this vampire sort of thing. 


Anyways… sorry, I know most of you love that, it’s just that I don’t get it girl. If you think you have 99 problems, please let this old lady reminds you that Gone With The Wind has at least 300 pages, or if you prefer the movie, well, that’s almost 4 hours. 


But who cares about problems, Scarlett was fabulous! hell yeah!. She knew perfectly what she wanted and no matter how miserable she could feel sometimes, she would never be plain and ordinary. I could give you tons of examples but for obvious reasons I’m going to talk about one in particular: the part where she had to ask Rhett for a money loan, embarrassing enough for a woman but… nevermind… she needed it to save Tara. He was in jail so she had to go there which isn’t anybody’s favorite place to go for a walk but what the hell, sometimes a girl gotta do what a girl gotta do… 


The problem was… she didn’t have a decent outfit to see her crush! THE HORROR!!!! 
Scarlett wasn’t precisely a ninja at sewing. Before the war started, she was just a young spoiled girl who had never put a button on a dress… and embroidery?? c’mon!!! 

Picture from: http://southernthings.web.unc.edu
Despite of this, she decided to solve the problem in the ‘Scarlett’ fascinating way: taking her velvet curtains and making a stunning dress out of them.


The authentic refashion that made history in the movies, by the way...  
Top that Katniss!

And if you think that was easy, just think what would you do if your super awesome dress gets burned with the iron just one hour before your date with the man of your dreams, and you only have nice curtains in your apartment! Lucky you that this blog exists to save you! 


I wish I could see more stories of brave women who demonstrate they’re not what they have but what they’re capable of doing with whatever life gives them. Women that face real challenges in the only way they can: being fabulous women… don’t you think? 


So, back to the refashions… do you remember any refashion that saved the day? wanna share it?

Saturday, November 8, 2014

The Snake-y Shirt

I bought this shirt back in 2006 when I was still single, young and beautiful... and didn't have that muffin top you see in the picture. I found it on sale (my favorite word!) when I was still living in Bogotá, Colombia. Not only the price was attractive but also the cross over style with the V-neck... kinda liked it back then.

It came with me when I moved to Canada and now, 8 years after I bought it I didn't feel like getting rid of it because... you know, it's part of the very few souvenirs I keep from my beloved country. It also has been always a good companion of adventures, the color is still in good condition and I still love some nice features like the print in the back... so I decided to take my needles, threads and scisors to start the resucitation of this old gal who joined me in so many parties and hangovers in my good old days.
The shirt is 90% cotton and 10% elastane. As you can see in the pic, it had two loooonnnng ropes? that I could tie up in my right side so the shirt doesn't open and leave my bbbeauties out there for the guys visual pleasure... It did look good on me 8 years ago, before the cake, the ice cream and the pregnancy started to build up my new body shape. But now, I felt that those to ropes -that look more like two snakes- were wrapping up and sophocating me until death!

So the first thing I did was trying it on once more to stablish the new siluete that made me look better. I secured two anchor points with two hand-sewed stitches. The first one was the V-nec vertex and the second one was placed in the right side of my hips. Here, I put two quick stitches to avoid leaving a long trace that could be interpreted as a surgery scar caused by a sword or appendicitis.

Now that I secured the interior layer of the shirt, I proceeded to secure the exterior. I put the shirt on a table and following the hem that was already there, I hand-sewed the fabric against the interior layer to close it. This way, the shirt won't open again.

Once the shirt was all closed, I could finally cut the snakes for good!!! what a relief!!!

I left a ruffly ending when cutting the exterior snake and then I remembered I bought some silvery decorative studs at Walmart that worked well as a cute finishing.

The girl in the back got earings as well!